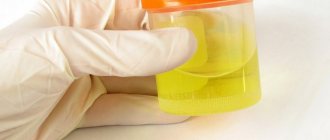
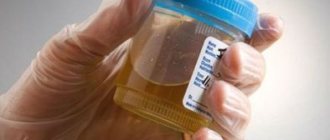
This section provides instructions for self-collection of biomaterial samples by patients for various laboratory tests. On the eve of taking the biomaterial, patients are recommended to purchase the appropriate container with instructions from the administrator of any Diagnostic Center of the Helix Laboratory Service. Detailed information for specialists (nurses, doctors) is contained in the protocols for obtaining and processing biomaterial samples.
Instructions for collecting and processing spot urine samples
- Preparing the patient for donation of biomaterial
- Protocol for collecting a single portion of urine
- Protocol for obtaining a single urine sample
Instructions for collecting and processing 24-hour urine samples
- Preparing the patient for donation of biomaterial
- 24-hour urine collection protocol
- Protocol for obtaining a 24-hour urine sample
Instructions for collecting and processing stool samples
- Preparing the patient for donation of biomaterial
- The procedure for collecting stool for microbiological studies, PCR studies, antigenic and general clinical studies (except for studies on helminth eggs, cysts and vegetative forms of protozoa)
- The procedure for collecting stool for research on helminth eggs, cysts and vegetative forms of protozoa
Instructions for obtaining and processing ejaculate samples
- Preparing the patient for donation of biomaterial
- Procedure for collecting ejaculate for microbiological studies and PCR studies
- The procedure for collecting ejaculate for spermogram
Instructions for obtaining and processing sputum samples
- Preparing the patient for donation of biomaterial
- Procedure for collecting sputum for PCR and microbiological studies
Instructions for obtaining and processing hair samples
- Preparing the patient for donation of biomaterial
- The procedure for collecting hair for the determination of narcotic, psychotropic and potent substances
- The procedure for collecting hair for genetic determination of kinship
- The procedure for collecting hair for microelement analysis
Instructions for obtaining and processing nail samples
- The procedure for collecting nails for the determination of narcotic, psychotropic and potent substances
- Procedure for collecting nails for microscopic and microbiological studies
Instructions for collecting and processing spot urine samples Protocol for spot urine collection
The procedure for collecting the first portion of urine
- In the morning, immediately after waking up, toileting of the genitals is not performed.
- Urination must begin directly into the container.
- Fill the container 2/3 of its volume.
- Continue urinating into the toilet.
- Close the container tightly with the lid.
The procedure for collecting an average portion of urine
- In the morning, immediately after waking up, the genitals are toileted.
- Urination should begin in the toilet.
- Fill the container with a medium portion of urine to 2/3 of its volume.
- Continue urinating into the toilet.
- Close the container tightly with the lid.
The procedure for collecting the third portion of urine
- The first and middle portions of urine are collected as described above. If necessary, before collecting the first portion of urine, the external genitalia is toileted.
- Collect the last (third) portion of urine into a container, filling it to 1/2-2/3 of its volume.
- Close the container tightly with the lid.
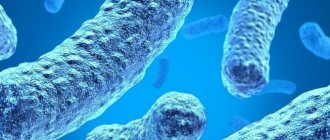
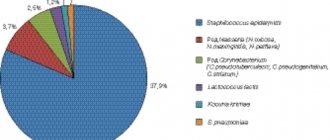
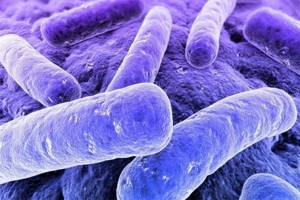
Bacterial composition of intestinal microflora
For convenience, doctors classify all microorganisms that inhabit the intestinal cavity according to whether they can pose any danger to their carrier under certain conditions.
Thus, we distinguish:
- healthy bacteria that function in the intestines and do not cause harm to the carrier: lactobacilli, bifidobacteria, Escherichia;
- opportunistic microorganisms that can provoke the development of certain pathological processes under certain conditions: clostridia, staphylococci, candida, enterococci;
- pathogenic, which are causative agents of dangerous diseases: salmonella, shigella.
Protocol for obtaining a single urine sample
Procedure for using a vacuum system with a self-contained urine transfer device
- Unscrew the lid of the container with the previously collected portion of urine.
- Insert the self-contained urine transfer device (holder) into the container (Figure 10). If urine remains in a container for a long time, it is necessary to mix it using a holder.
- Insert the test tube into the holder. Press the tube so that the holder needle pierces the rubber stopper in the tube cap (Figure 11). Immediately after this, the test tube will begin to fill with urine.
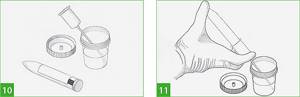
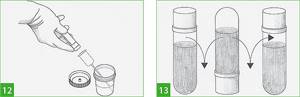
- Once urine has stopped flowing into the test tube, remove the test tube from the holder (Figure 12).
- Invert the tube several times to mix the urine with the preservative (Figure 13).
- Deliver the sample in a tube during the day to any Diagnostic Center of the Helix Laboratory Service, transporting at room temperature.
Procedure for using a vacuum system with a built-in urine transfer device
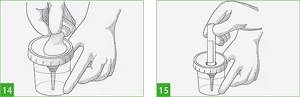
- Remove the protective sticker from the lid of the container with the previously collected portion of urine, exposing the needle of the built-in urine transfer device, which is covered with a protective cap (Figure 14). If the urine has been in the container for some time, you need to stir it.
- Insert the tube into the hole of the built-in urine transfer device. Press the tube so that the needle of the built-in device pierces the rubber stopper in the tube cap (Figure 15). Immediately after this, the test tube will begin to fill with urine.
- After urine stops flowing into the test tube, remove the test tube from the built-in device.
- Invert the tube several times to mix the urine with the preservative (Figure 13).
- Deliver the sample in a test tube as soon as possible (no more than 3 hours from the end of collection) to any Diagnostic Center of the Helix Laboratory Service, transporting at room temperature.
Instructions for collecting and processing 24-hour urine samples 24-hour urine collection protocol
Procedure for collecting 24-hour urine using a preservative-free kit
- After waking up, when urinating for the first time in the morning, completely empty your bladder (this portion of urine is not collected in the container).
- Collect urine in a container from the second urination, the time of which must be recorded. It is allowed to collect urine in any clean container, followed by immediate transfusion into a container for collecting daily urine.
- Collect all urine collected during the day and night. The morning urine sample of the next day (before the time recorded the day before) is also collected in a container. It is also necessary to collect the urine that comes out during bowel movements.
- Throughout the entire period of urine collection, store the container in the refrigerator at a temperature of +2...+8 °C. Freezing is unacceptable!
Procedure for collecting 24-hour urine using a kit with a preservative
One of the preservatives is strong hydrochloric acid, which can cause a burn if it comes into contact with the skin! If the preservative gets on your skin, immediately rinse the area with plenty of water and seek medical help! If a preservative gets into the esophagus, you must immediately call a doctor!
- After waking up, when urinating for the first time in the morning, completely empty your bladder (this portion of urine is not collected in the container).
- Before starting urine collection, pour out the preservative from the bottle included in the kit into the container for collecting 24-hour urine (Figure 16).
- Collect urine in a container from the second urination, the time of which must be recorded. It is allowed to collect urine in any clean container, followed by immediate transfusion into a container for collecting daily urine.
- Collect all urine collected during the day and night. The morning urine sample of the next day (before the time recorded the day before) is also collected in a container. It is also necessary to collect the urine that comes out during bowel movements.
- Throughout the entire period of urine collection, store the container in the refrigerator at a temperature of +2...+8 °C. Freezing is unacceptable!
Requirements for collecting material for analysis
Carrying out a bacteriological analysis of stool requires certain preparatory measures from the patient. Feces are a waste product of the human body, which reflects the way it feeds.
Therefore, in order to ensure the most objective diagnosis, doctors recommend, first of all, to consult with your doctor and, approximately 5-7 days before sampling stool for pathogenic intestinal flora, stop taking antibiotics, anti-diarrhea drugs, anthelmintics, laxatives , enzyme-containing and iron-containing drugs. It is not recommended to do cleansing or therapeutic enemas 3-4 days in advance. The doctor who will conduct the test should be warned about all medications taken shortly before the test. If the subject has visited other countries in the last six months before the analysis, the doctor should also be informed about this.
As part of the patient's preparation, 2-3 days before the scheduled date of the test, you should follow a diet that excludes foods that increase gas formation or color the stool. Prohibited:
- legumes;
- beet;
- raw vegetables and fruits;
- bread and pastries;
- milk and dairy products;
- greenery;
- tomatoes;
- red fish.
When preparing a diet during this period, it should be remembered that eating meat can also affect the results of the analysis. It is not allowed to take stool for analysis that was obtained using laxatives or an enema. All these recommendations are relevant for planned collection of material.
Protocol for obtaining a 24-hour urine sample
The procedure for collecting a 24-hour urine sample into a transport vacuum tube
- Close the lid of the container for collecting daily urine tightly.
- Mix the urine by carefully turning the container over.
- Remove the protective sticker, exposing the needle of the built-in device for transferring urine into the test tube, covered with a protective cap.
- Turn the container upside down and insert the transport tube into the hole of the built-in device for transferring urine into the tube.
- Press the tube so that the needle of the built-in device pierces the rubber stopper in the tube cap (Figure 17). Immediately after this, the test tube will begin to fill with urine.
- After urine stops flowing into the test tube, remove the test tube from the built-in device.
- Write on the label of the tube the amount of urine excreted per day (in ml).
- Deliver the sample in a test tube as soon as possible (no more than 2 hours from the end of collection) to any Diagnostic Center of the Helix Laboratory Service, transporting at room temperature.
The procedure for collecting a 24-hour urine sample into a transport container
- Close the lid of the container for collecting daily urine tightly.
- Mix the urine by carefully turning the container over.
- Unscrew the lid of the container for collecting daily urine.
- Collect at least 50 ml of urine from the 24-hour urine collection container into a urine transport container (Figure 18).
- Write on the label of the transport container the amount of urine excreted per day (in ml).
- Deliver the sample in a container as soon as possible (no more than 2 hours from the end of collection) to any Diagnostic Center of the Helix Laboratory Service, transporting at room temperature.
The procedure for collecting stool for research on helminth eggs, cysts and vegetative forms of protozoa
For research, feces are collected from any clean container immediately after defecation!
- A special container is required, which can be purchased at Helix Centers.
- Collecting stool samples from toilet bowls is not permitted.
- For children, it is possible to collect a sample from a diaper, diaper or potty.
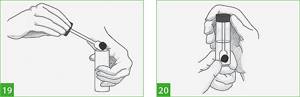
- Using a spoon in the lid of the container, collect enough material from at least three points of the stool into the container so that the level of the liquid (preservative) is equal to or slightly above the mark on the container. If there is not enough stool, place all the stool that is available in a container (Figure 19).
- Make sure the sample is in the liquid and not on the sides of the container.
- Screw the cap on tightly and gently shake the container to mix the sample and preservative (Figure 20). If the stool is hard, use a spoon on the lid of the container to stir the stool sample. It is possible to collect stool samples for diarrhea, blood and mucus in the stool.
- Place the container in a plastic bag (Figure 21).
- Deliver the package with the sample as soon as possible (no more than 3 hours from the end of collection) to any Diagnostic Center of the Helix Laboratory Service, transporting at room temperature.
Why is intestinal microflora needed?
It is well known that the human intestine contains a large number of different microorganisms, a total of more than 500 species. Most of the microflora “live” in the large intestine, a smaller amount – in the small intestine and appendix.
Content:
- Why is intestinal microflora needed?
- Bacterial composition of intestinal microflora
- What is it prescribed for?
- Indications and contraindications for stool culture
- Requirements for collecting material for analysis
- How does the patient collect material for analysis?
- Taking stool for analysis in a laboratory or hospital
- How further processing of feces occurs
- Technique for bacteriological and scatological examination of stool
Although, at first glance, it may seem that their functional significance for humans is not particularly important, but in fact, the work of these bacteria is directly reflected in the health of their carrier.
In the intestinal cavity, bacteria attach to the villi of the epithelium. One of their functions is the production of a special mucous biofilm, which is responsible for maintaining the population of beneficial microorganisms and protects them from external influences.
During their life, bacteria actively multiply, participating in the processes of digestion of food and absorption of nutrients by the human body.
If foreign microorganisms enter, the “strangers” are destroyed, displaced, or their adaptation occurs, and they also begin to participate in the general activity of intestinal bacteria.
In addition to those described above, microorganisms in the intestine perform other functions - they break down and digest food, protect the epithelial inner layer of the intestine, participate in metabolic processes, synthesize some vitamins and amino acids, form reactions of the immune system, and protect against various pathogenic organisms.
At the same time, part of the microbiota of the intestine itself is opportunistic, such as E. coli. In normal quantities, it is indispensable in the digestive process.
Any changes in the quantitative or qualitative ratio of microflora in the intestine leads to a deterioration in human health.
The procedure for collecting hair for microelement analysis
- Cut small tufts of hair, 3–4 cm long, from the occipital, posterior parietal and posterior temporal areas of the scalp as close to the root as possible. The thickness of the total hair bundle should be about 1 cm. If the cropped hair bundle is longer than 3–4 cm, it must be cut off, leaving for examination the part that was closer to the scalp. If the cut hair is short, you need to collect it in a volume equal to one teaspoon.
- Place hair in a gripper bag.
- Deliver the gripper package with the sample to any Diagnostic Center of the Helix Laboratory Service, transporting at room temperature.
What is it prescribed for?
Analysis of stool for intestinal infections and dysbacteriosis allows us to identify all types of microorganisms, including pathogenic ones. The essence of the examination is to inoculate the excretions of the human body on nutrient media, as a result of which all the bacteria present in the stool begin to multiply intensively and become easy to detect. Often, a test, also called stool culture, is prescribed for children.
Based on the results of the analysis, the attending physician receives information about the presence of abnormalities in the intestines, the causes of disturbances in the digestive process, imbalance of microflora, and the presence of parasites and helminths in the intestines.